How to grow Jaltomata
If you plan to grow plants outdoors in the summer here in Connecticut, plant seeds indoors in early April. Use a heat mat under the cups holding the seeds and keep the seeds moist not wet. Seeds of some species seem to need, to get a high percentage to germinate, sun and / or temperature fluctuations as we experience on a sunny window sill here in Connecticut in May or outdoors in June.
Try some of your plants in the ground and some in pots. If grown in pots outdoors, try about 2/3 top soil and 1/3 potting mix. Thoroughly mix these components.
It is best to gradually transition plants to larger and larger pots. In other words from a 4" pot as it gets too big move it to a 6" pot.
Keep in mind that while in small pots plants dry out easily. When grown in pots outdoors in the summer in Connecticut, one often needs to water twice a day.
If the the plants get used to an environment with no wind and indirect sun (indoors) and then you abruptly move them to outside, they may die. To gradually transition them to the outside put them out for a few hours a day for a week or so. The next week leave them out all day and bring them in for the night if nights are not yet warm. Next, leave them out all the time.
Return all pots you borrowed to the CCSU greenhouse in the fall. You don't need to wash them, just place them to the left edge of the sink.
- - - - - - - - - - - - - - - - - - - - - - -
Joe Fitzsimons developed the first wicking system working with J. chihuahuensis, 2013
A paper towel was obtained for each accession. Water was added to the paper towels until wet, and then rung out until damp. The paper towels were then folded until it was 1/4th of the original size. The seeds where then placed inside of the folds in the paper towels, so that the seeds will be completely surrounded by the damp paper towel. The damp paper towels were then placed into a sealable sandwich bag to keep the loss moisture to a minimum. The bags were placed on a windowsill to absorb sun light. The paper towels were checked every day to see if the radicals have sprouted from the seed and water was added as necessary. Once the radicals have sprouted from the seed, they were carefully transferred into a red solo cup filled with damp Miracle-Grow potting mix. Before transferring the seeds into the solo cup a pencil was used to make holes big enough to fit the seeds and the sprouting radicals, the seeds were placed into the holes and covered with the potting soil. They were placed on the windowsill for heat and sun light. Once all of the seeds were transferred from the paper towels to the solo cups and have sprouted above the soil; each individual plant was transplanted to a 3”x3”x3” pot and labeled with their corresponding phenotypes. In each pot 4 pellets Osmocote Plus 5-6 month slow release were added. They were kept under 2 Sylvania 22029 - F20T12/GRO/AQ/RP Fluorescent Plant Aquarium Terrarium Tube Light Bulb which were kept about 6 cm above the plants, and kept on an automated timer so that the lights were on for 18 hours and off for 6 hours. After 6 weeks they were transplanted into a 4”x4”x4” pots with holes in the bottom so that a wicking system could be used. A wicking system was used so they do not require daily watering. Two 100% cotton strips were cut about 10” in length and 1” in width, enough were cut so that each plant would have two strips. The strips where then placed through the holes at the bottom of the pots so that each strip was hanging out by about 4 inches. One of the two strips was coiled in the bottom with some soil, then the plant was the placed on top. Then the plant and soil from the other pot were placed on top the coiled cotton strip while the other was then spiraled upwards and then covered with soil the pot was filled. In each pot 4 pellets of Osmocote Plus 5-6 month slow release were added. They were then placed into a perforated tray, there were four 3”x3”x3” pots in the corners of another tray full of water which the perforated tray with the plants in it was then placed on. This way the cotton strips were in the water drawing water from the tray into the soil, keeping the soil moist. Once the plants became too big to keep on the cart they were moved outside, into a 2’x2’ hole with a soil mixture of 50% top soil and 50% potting mix. Each hole was dug approximately 3ft away from each other. There were 2ft stakes and tie wraps were used to keep the jaltomatas from falling over. They were watered twice a day, and once a week a cap full of Miracle-Grow All Purpose Plant Food was poured into a 1 gallon watering can and dispersed evenly among the plants to ensure that they were getting enough nutrients.
- - -
The following was contributed by Derek J. Santoro, 2010
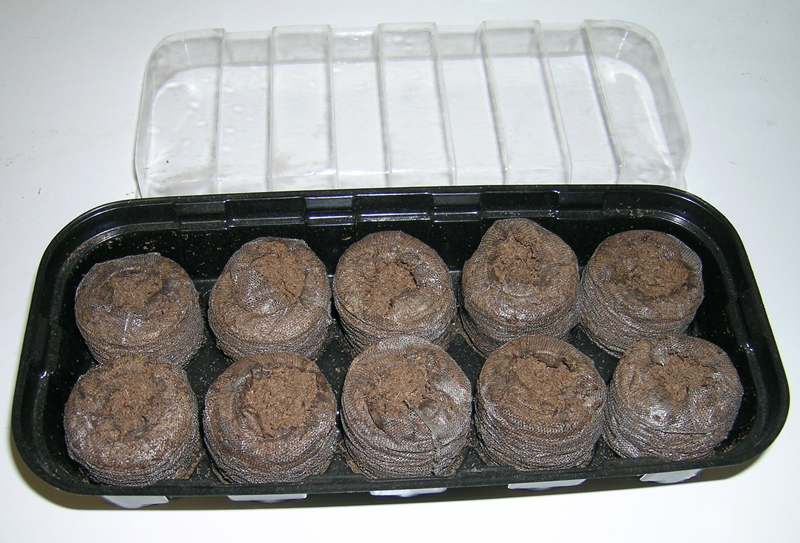
Obtain a small Jiffy® peat pellet greenhouse with 10 Jiffy® peat pellets. Add warm tap water to allow the pellets to expand. Water should be poured on top of pellets to just below the rim where the cover fits. Allow pellets to absorb water until fully expanded. Pour off any excess water left in the bottom of the tray.
With a toothpick or small similar pointed tool, spread the top net away and move away some soil to create a depression about 3 times the size of the seed. Place a seed into each pellet, and cover the seed with soil from the depression using the toothpick/tool. Place the cover on the greenhouse and place in a sunny windowsill (south facing provides the most light). A germination heat mat may be placed underneath the greenhouse to speed germination (a cast iron radiator was used in lieu of a heat mat). Two or more days after germination occurs, plants can be transplanted into 3" x 3" x 3" pots, with Miracle-Gro® potting mix.
Plants can then be placed into a basement, or other area which averages 55° F, on a light rack with fluorescent light for 12 hours a day. The light rack consisted of a timer and 4 fluorescent T-12 size plant and aquarium bulbs, which can be purchased at a local big box or home improvement store. The bulbs can be placed into 4 foot shop light fixtures that are suspended by chains. The height of the fixtures should be adjusted so they remain 5 to 7.5 cm above the plants as they grow. Plants should be kept moist between waterings, and soil not allowed to dry out. Plants can be hardened off over a period of 1 week to acclimate to the outdoors.